Theme Options
Minimal Shop has an advanced Framework Options panel that is loaded with options. We have the options organized into logical tabbed sections, each option has a description of what it will do on the front end. Because of the sizable amount of options Minimal Shop provides, we cannot go over them in full detail here in our documentation.
We encourage you to please take some time and navigate through each tab to see what we offer. Go to Appearance > Pediatric Options in your WordPress admin dashboard to access the theme Options panel. You can also backup your theme options by clicking on the Backup tab. That is a great way to move your custom options from site to site.
General Options
Go to Dashboard > Appearance > Pediatric Options > General > General Options
Globally Show Page Comments : Enable or Disable to show comments on all the pages. This will globally override your “Allow comments” option under your page “Discussion” settings.
Show all pages in Pagination : Enable or Disable to show all the pages instead of dots near the current page.
Style Picker : Enable or Disable to show the style picker in your pages.
Site Loader : Enable or Disable to show the site loader.
Google Map API Key : Put a valid google account API key here.
Mailchimp API Key : Put a valid mailchimp account API key here.
Breadcrumb Options
A breadcrumb navigation provide links back to each previous page the user navigated through, and shows the user’s current location in a website
- Choose a predefined theme skin, a predefined color scheme or set a custom primary color.
- Appearance > Minimal Shop Options > Layout > Breadcrumb Options
Show Breadcrumb : Enable or Disable to display breadcrumb for all pages.
Breadcrumb Delimiter : Choose delimiter style to display on breadcrumb section.
Breadcrumb Style : Choose alignment style to display on breadcrumb section.
Background : Choose background options for breadcrumb title section.
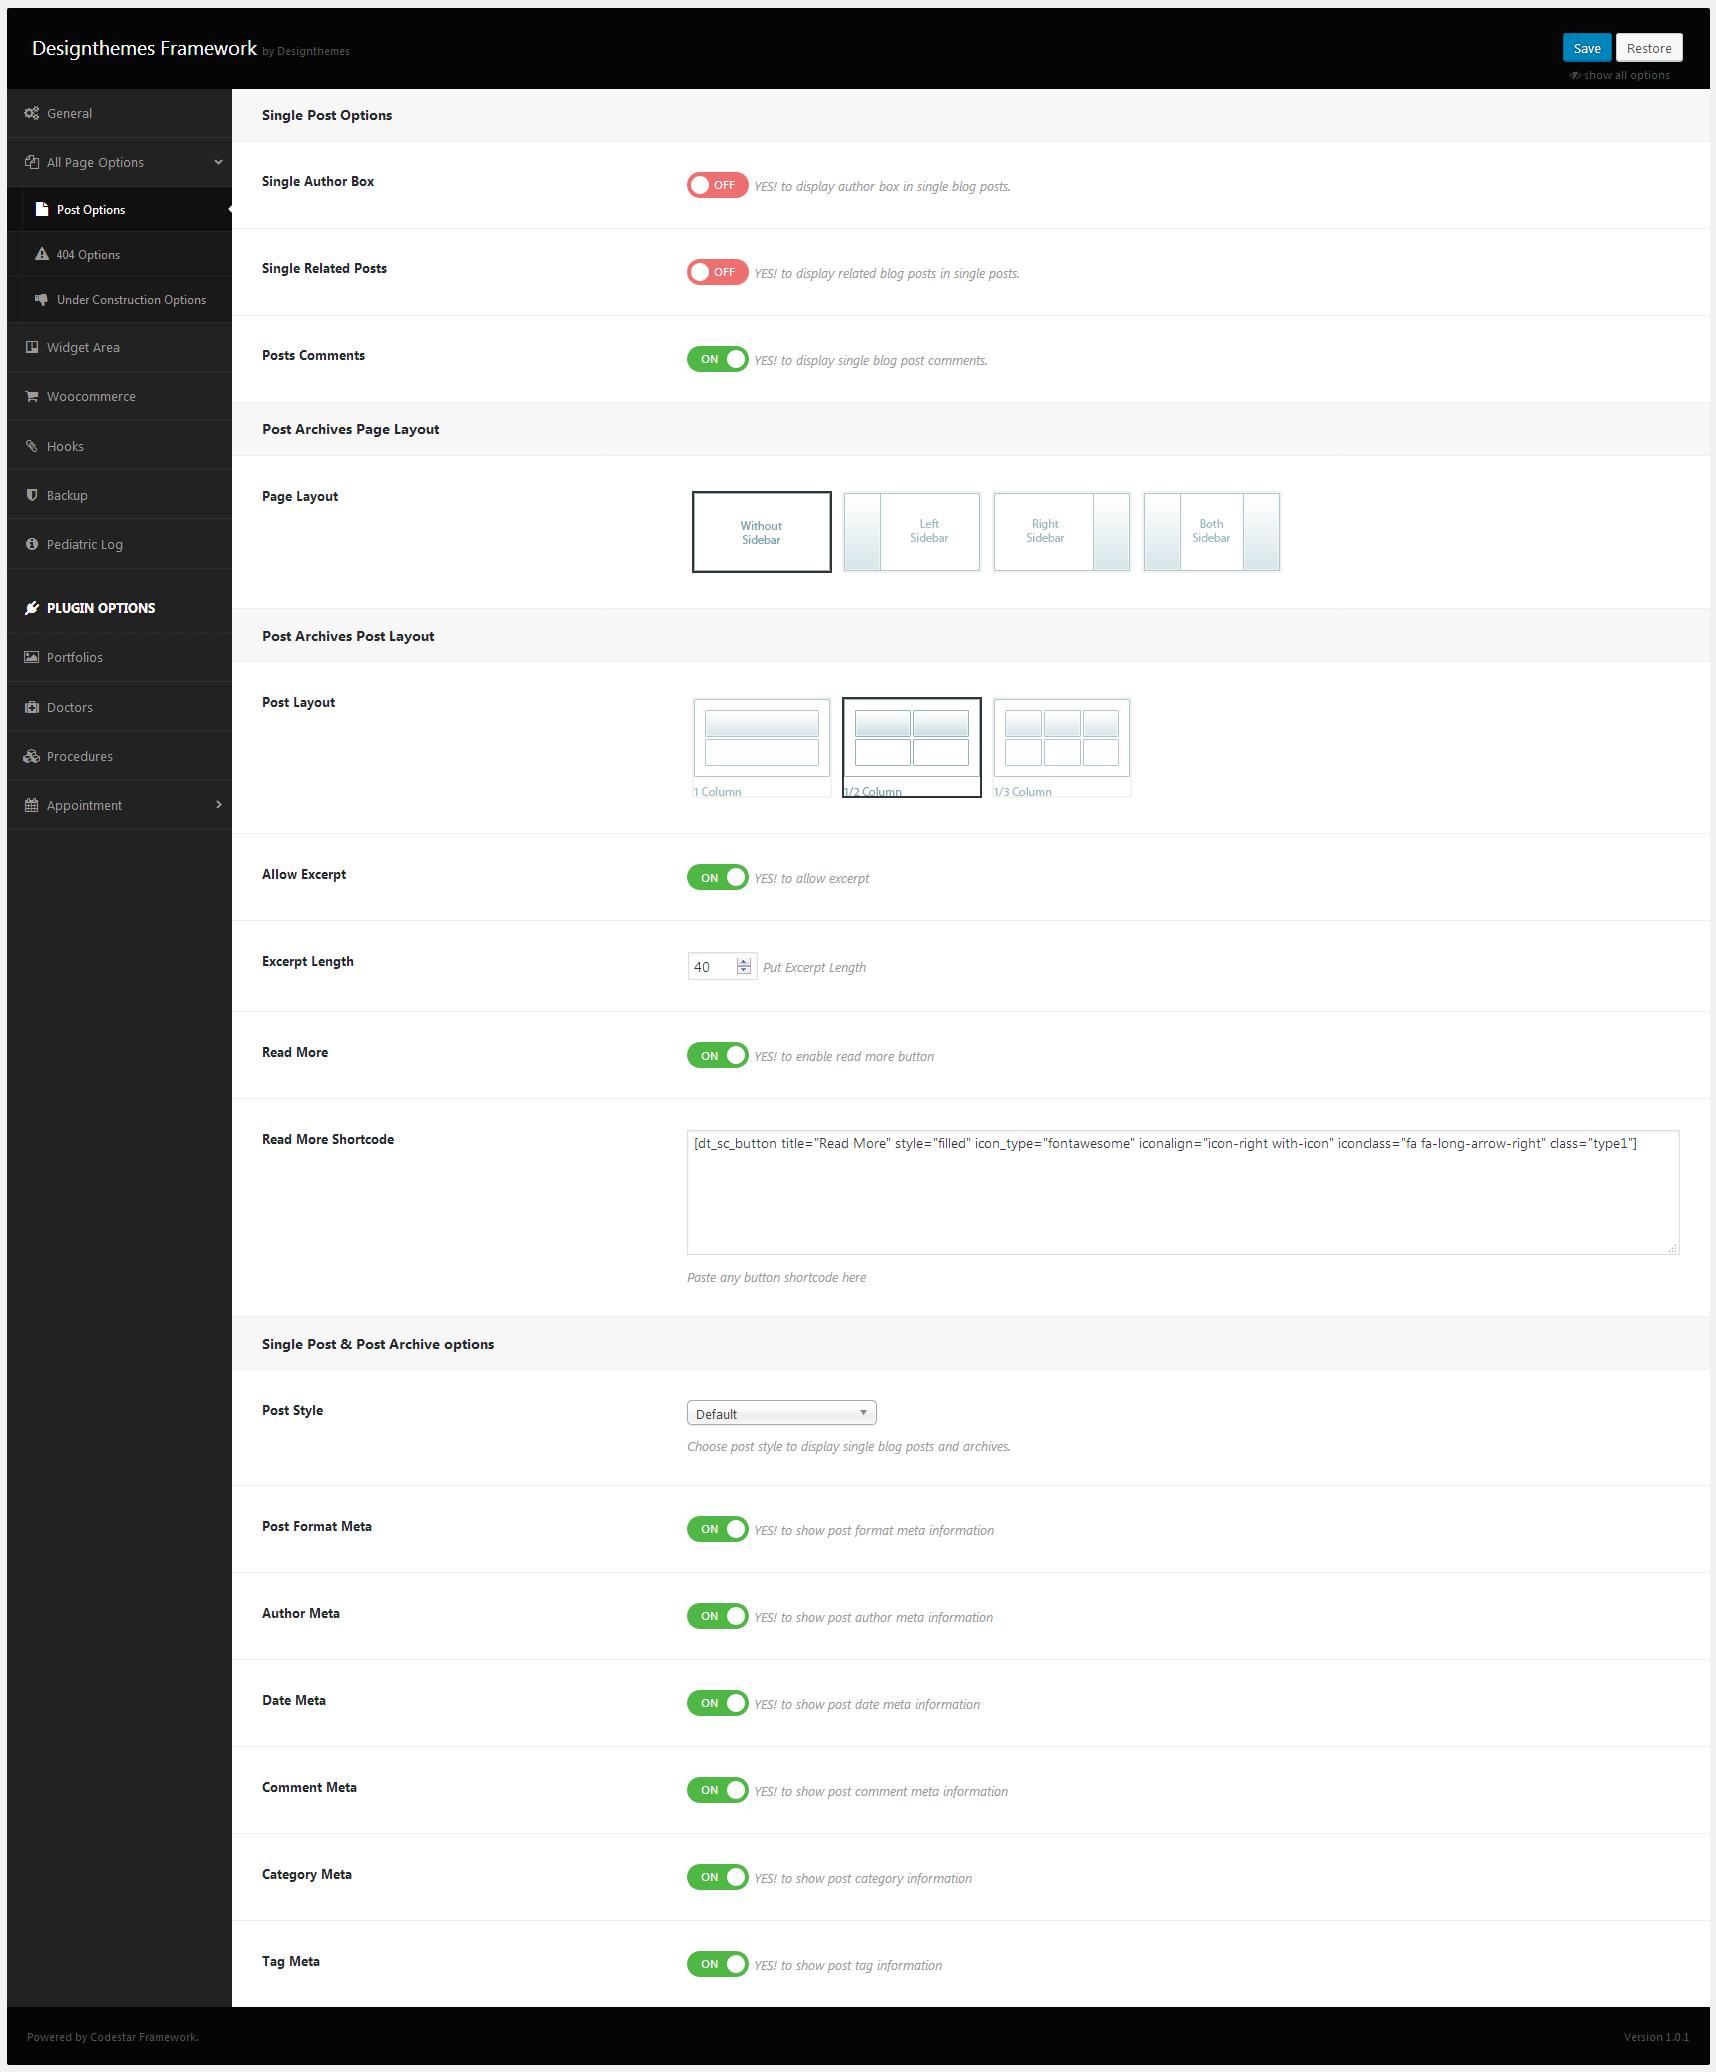
Post Options
Post – Single Post customization
- Post Single – Here you can show / hide ‘Author Box’ (contains author details) and ‘Posts Comments’.
- Post Archives – Choose any one of the available layout types. Also you can choose the archive page layout (without sidebar, left sidebar, right sidebar) and post layout (1 column, 2 column, 3 column)
- Archives and Single Post Options – Here you control the displaying of ‘Post Format’, ‘Author’, ‘Date’, ‘Comment’, ‘Category’ and ‘Tag’.
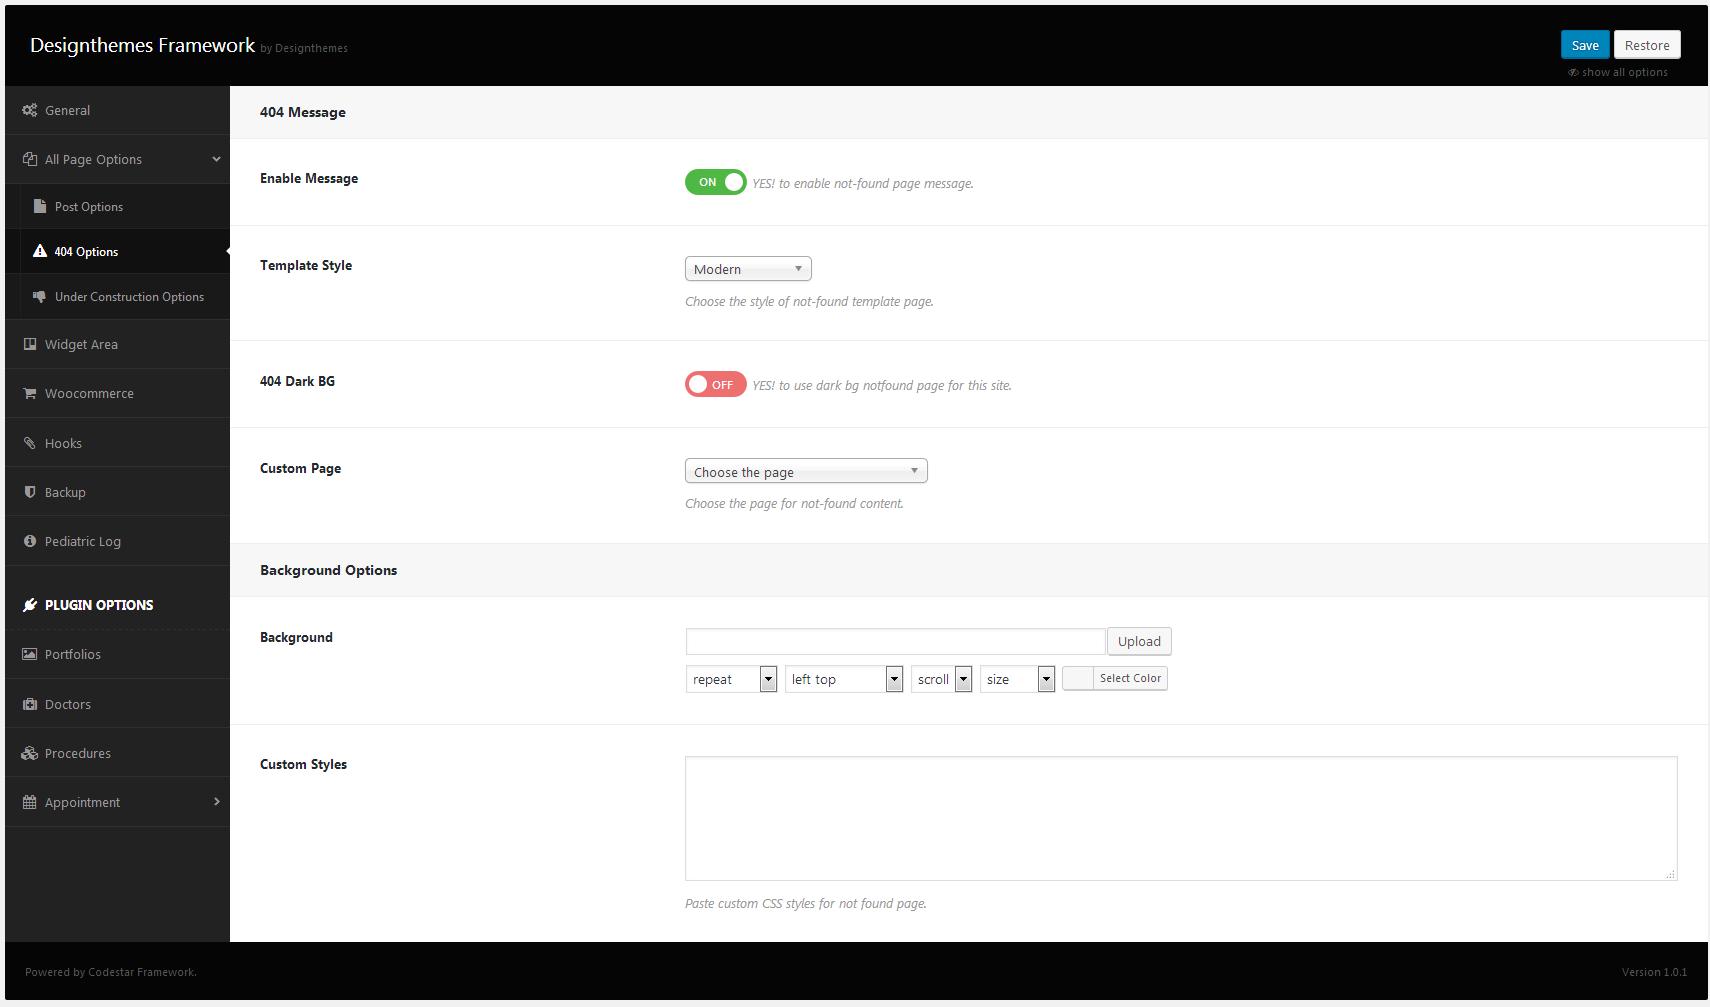
404 Options
Options relating to Error 404 page
- Enable Message – You can choose enable/disable for 404 message.
- Template Style – Choose the style of not-found template page.
- Custom Page – Choose the page for not-found content.
- Background Image – Upload an image for not-found page’s background.
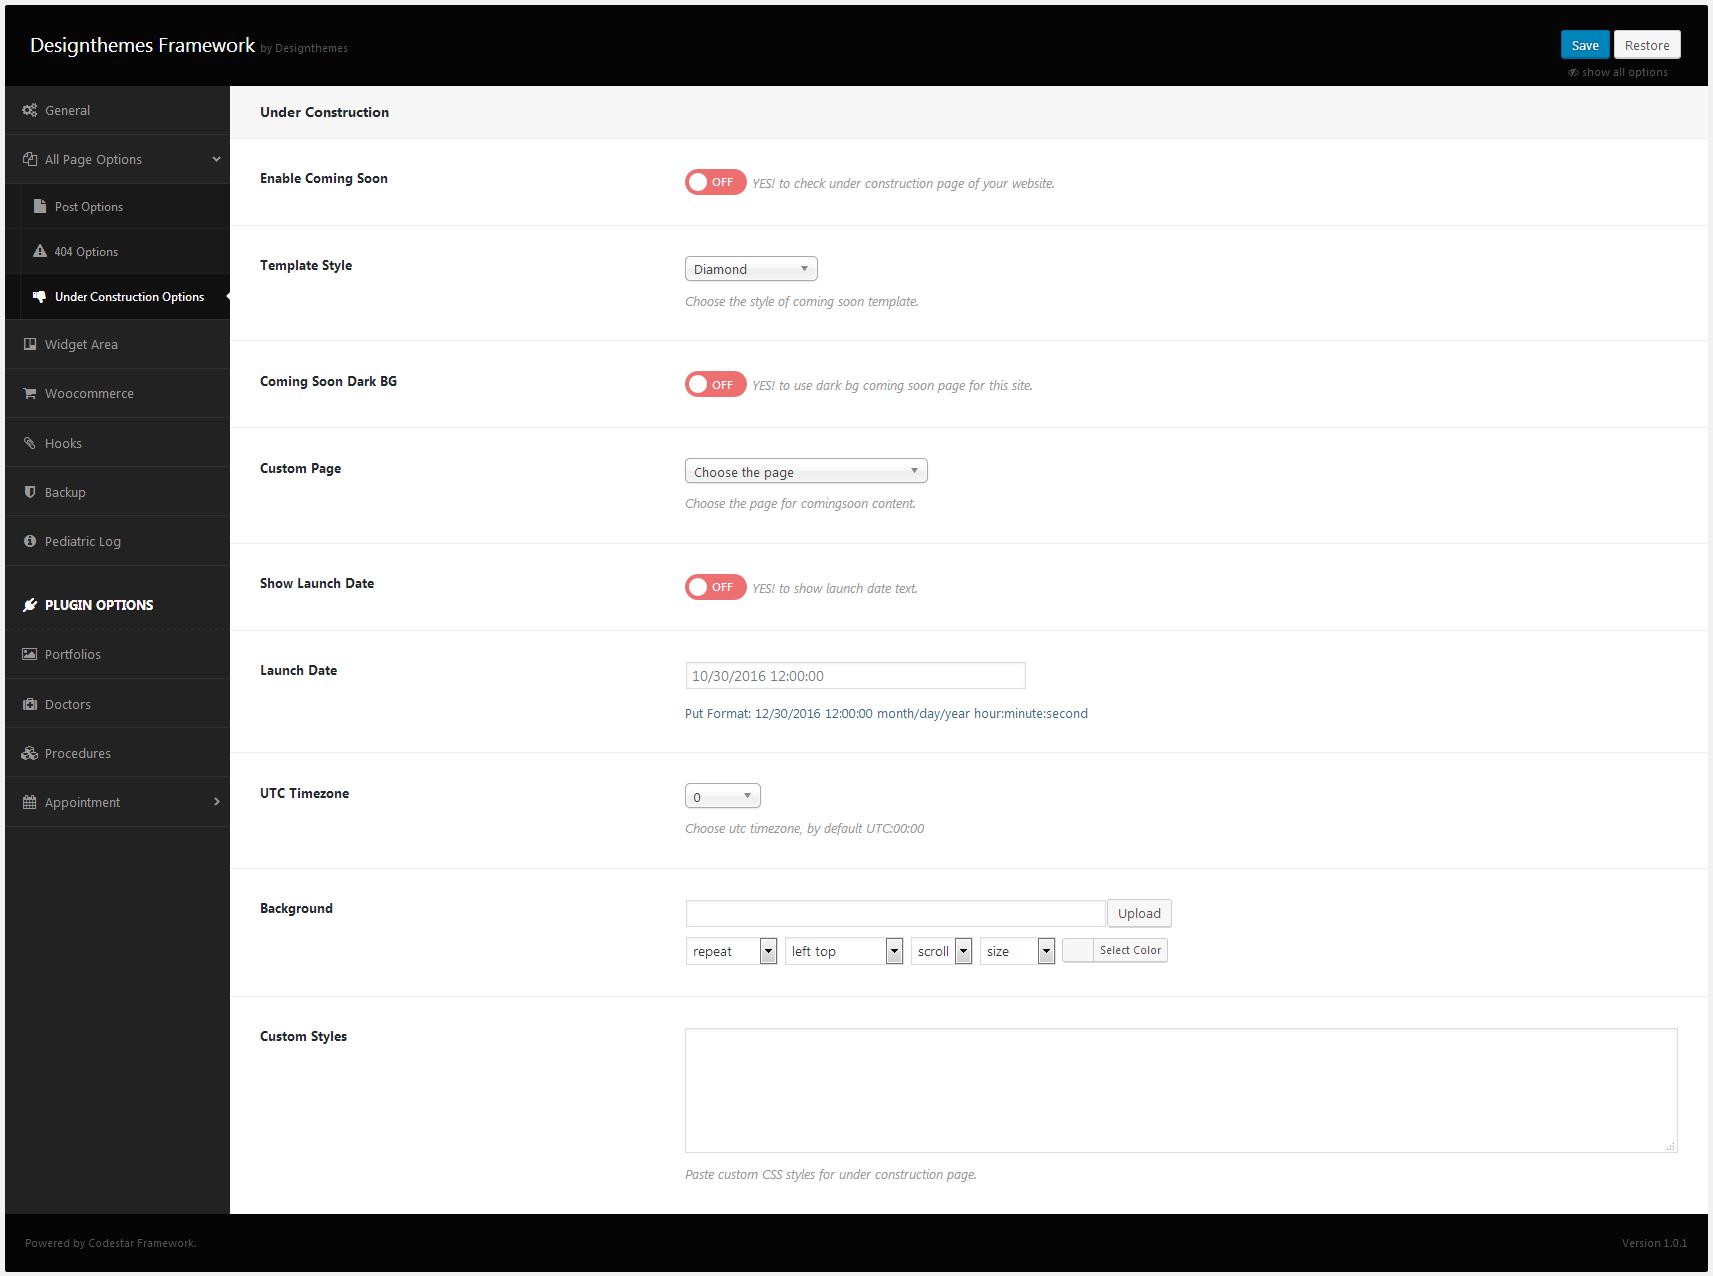
Under Construction Options
Options relating to the under construction page
- Enable Message – You can enable or disable the page content for the under construction page.
- Template Style – Choose the style of coming soon template..
- Custom Page – Choose the page for comingsoon content.
- Show Launch date – Enable/ Disable to show launch date text.
- Launch date – Put Format: 12/30/2016 12:00:00 month/day/year hour:minute:second
- UTC Timezone – select the appropriate timezone.
- Background Image – Upload an image for coming soon page’s background.
Widget Area Options
Widget Area – To create custom widget areas
A WordPress Widget is a small block that performs a unique function. Widgets can then be added to widget-ready areas of the theme called widget sections. Minimal Shop has some pre-made widget sections and also allows you to create an unlimited amount of custom widget sections.
You can create custom widget areas and you can assign it to any post, pages,….
Woocommerce Options
Minimal Shop is compatible with WoCommerce and includes full design integration as well as custom shortcodes. To get started with creating your online shop, you need to install the free WooCommerce Plugin. This documenation on using WooCommerce is the very basic information you need to get started. Please take a look at the important links below that have additional information about using WooCommerce.
To get this option install WooCommerce plugin. And the plugin bundled with dummy data which can be imported to instantly give you a working store with products to test the different features WooCommerce has to offer.
Available Options:
- No.of Products to show in main shop page.
- Choose products style to display shop & archive pages.
- Product Layout – 4 types of products layouts are there. (I Column, II Column, III Column & IV Column )
- Product Details, Product Category, Product Tag page layouts.
- Also you can easily handle widget areas for individual Product, Product Category, & Product Tag in the Role -> “Widget Area” Settings.
Sociable Options
Social icons
Minimal Shop includes a wide range of social icons that can be used in several locations on your site. All social icons are CSS based font icons which ensure that they are high quality, and can be configured using the available options. Continue reading below to learn more about how to set up the social icons, how to customize different settings, and how to display and integrate them.
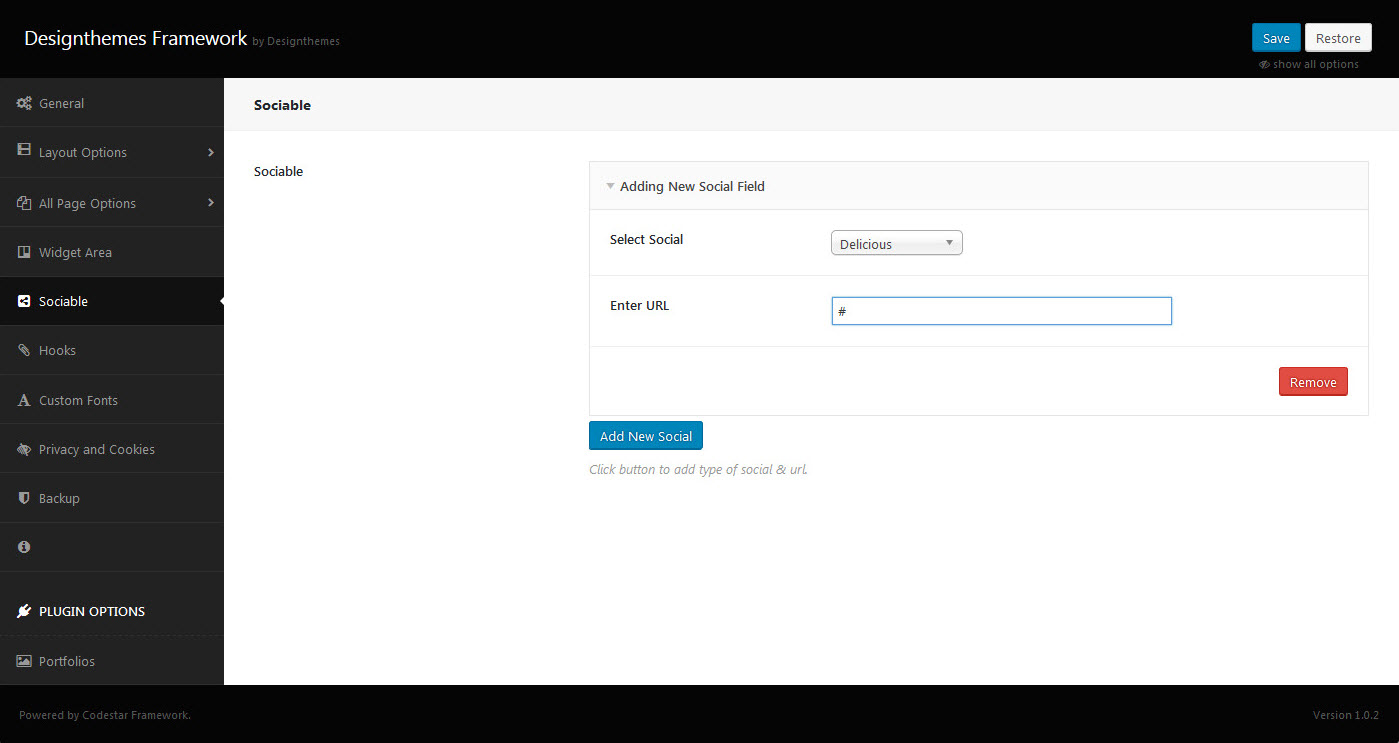
Site Sociable
To set up social icons, right top corner, navigate Appearance > Minimal Shop Options > Sociable > Site Sociable and set up links for social profiles. Note: Each external link should always start with http://!
Social Media Links
The Social Media tab in Theme Options is where you will insert your custom social media links for each network you want to display. The URL’s you enter on this tab will apply to the social icons in the header, footer or social sharing box.
Hooks Options
Hooks : Here you can add HTML content and Shortcode.
- Top – You can choose enable/disable for Top hook.
- Content Before – You can choose enable/disable for Content Before hook.
- Content After – You can choose enable/disable for Content After hook.
- Bottom – You can choose enable/disable for Bottom hook.
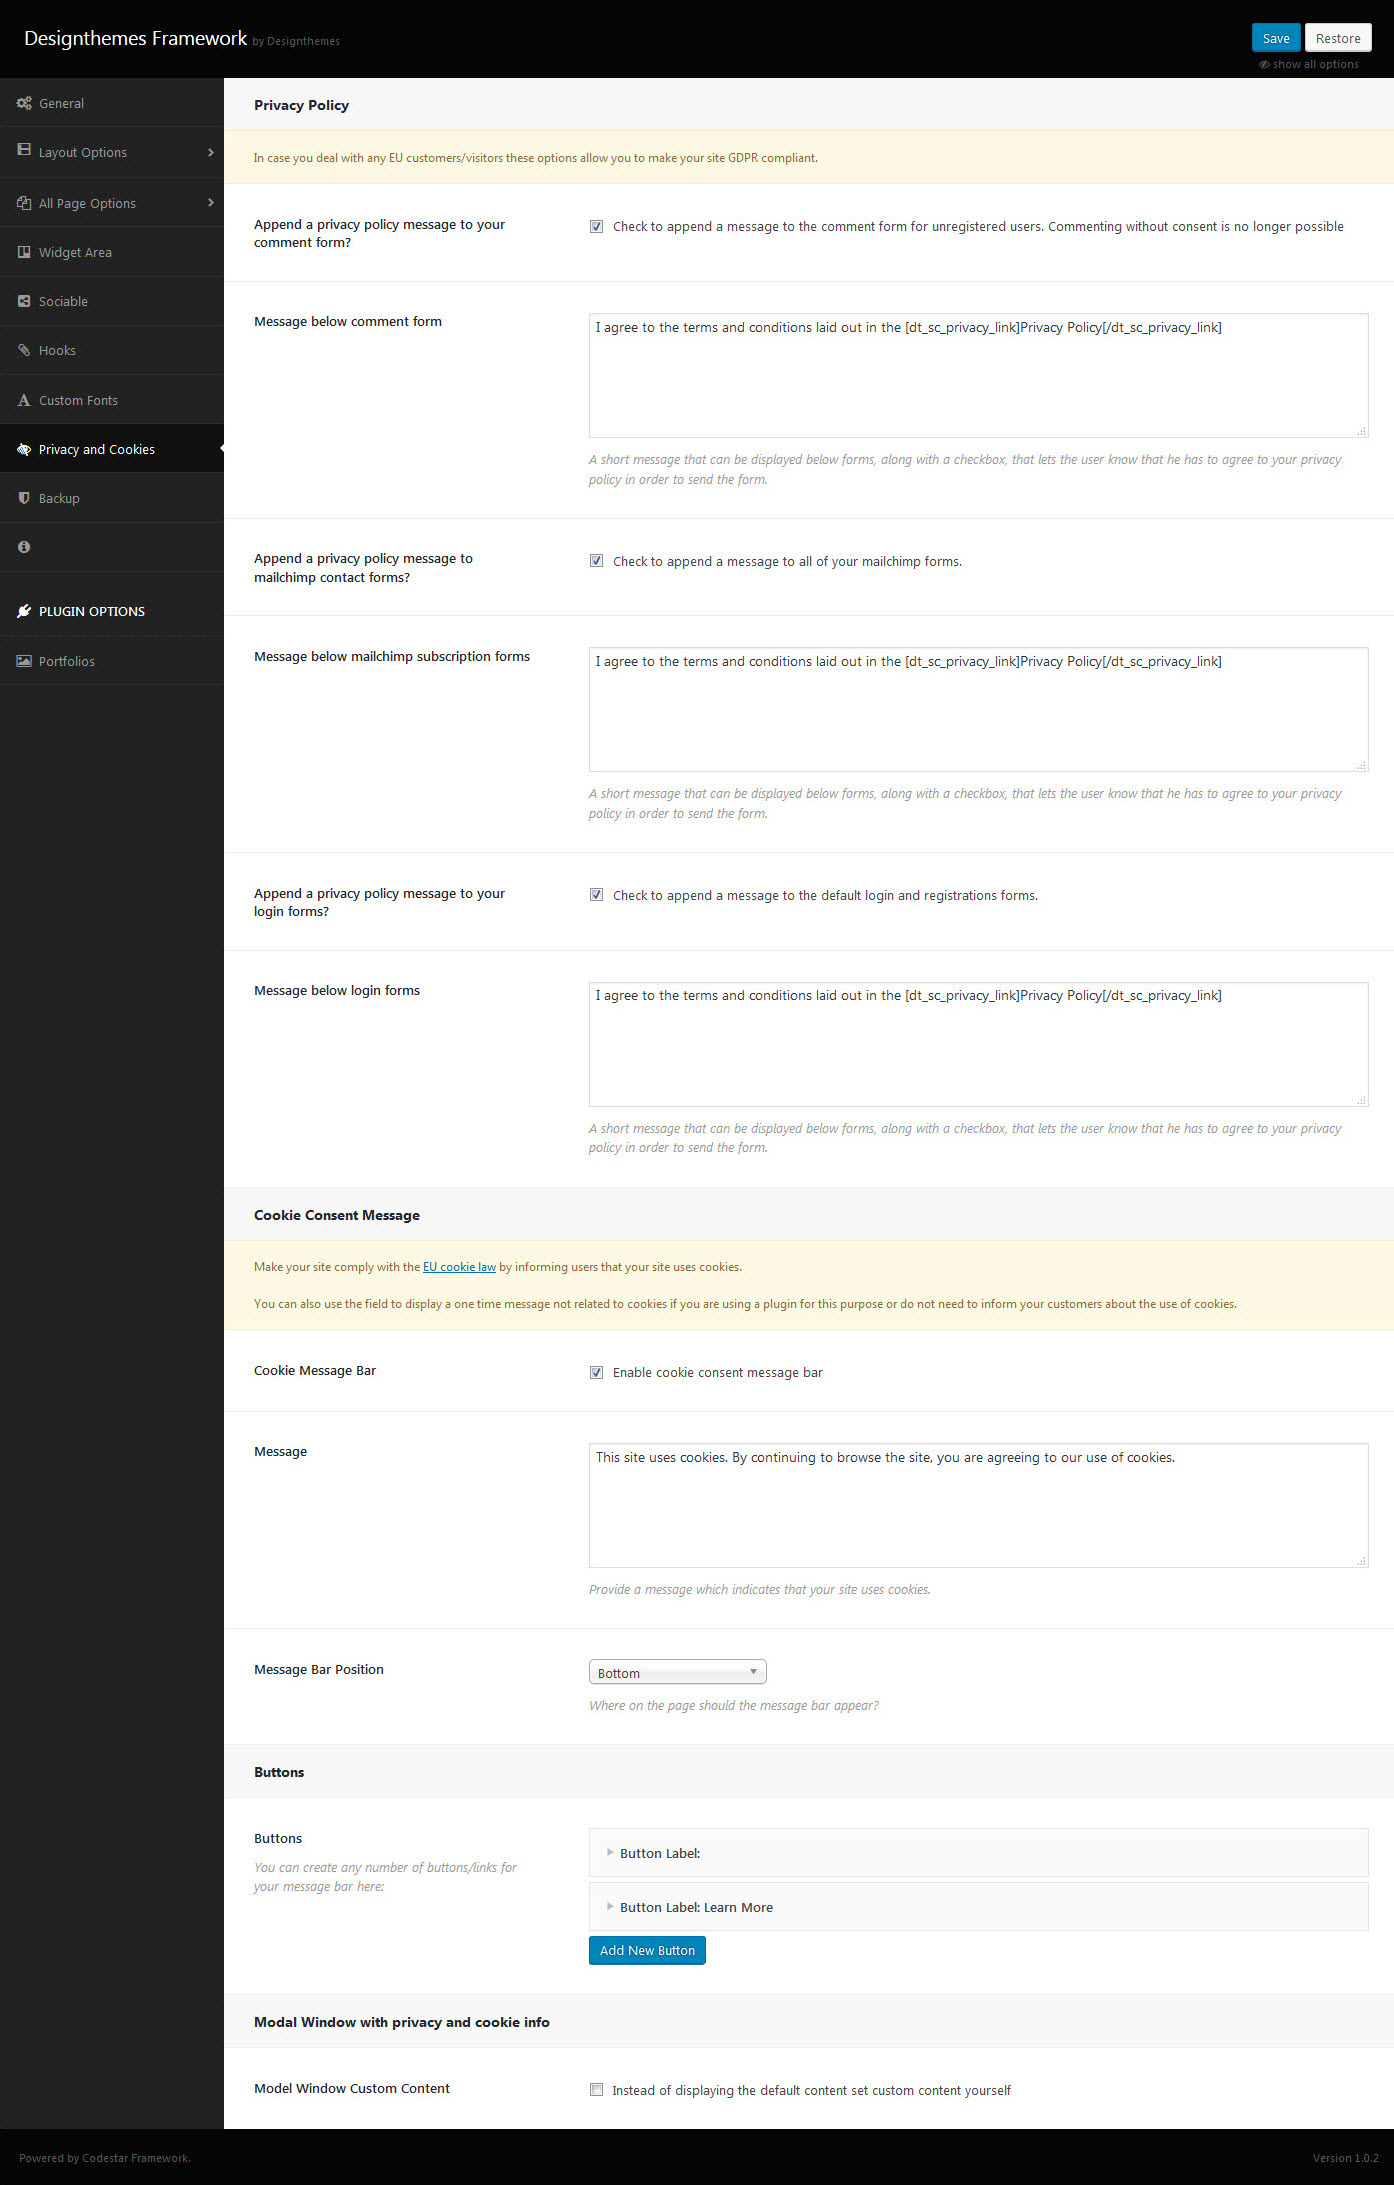
Privacy and Cookies
In this tab you can customize your Privacy and Cookies option for comment form, mailchimp contact forms and login forms.
You can create Cookie Consent Message with the option of Cookie Message Bar with Message, Message Bar Position.
And You can create any number of buttons/links for your message bar with Add New Button option.
And also you can enable or disable Modal Window with privacy and cookie info Instead of displaying the default content set custom content yourself.
Privacy Policy
Append a privacy policy message to your comment form? – Check to append a message to the comment form for unregistered users. Commenting without consent is no longer possible.
Message below comment form – A short message that can be displayed below forms, along with a checkbox, that lets the user know that he has to agree to your privacy policy in order to send the form.
Append a privacy policy message to mailchimp contact forms? – Check to append a message to all of your mailchimp forms.
Message below mailchimp subscription forms – A short message that can be displayed below forms, along with a checkbox, that lets the user know that he has to agree to your privacy policy in order to send the form.
Append a privacy policy message to your login forms? – Check to append a message to the default login and registrations forms.
Message below login forms – A short message that can be displayed below forms, along with a checkbox, that lets the user know that he has to agree to your privacy policy in order to send the form.
Cookie Consent Message
Cookie Message Bar – Here you can enable cookie consent message bar.
Message – Here you can provide a message which indicates that your site uses cookies.
Message Bar Position Here you can choose Where on the page should the message bar appear? Like Top / Bottom / Top Left Corner / Top Right Corner / Bottom Left Corner / Bottom Right Corner.
You can create Cookie Consent Message with the option of Cookie Message Bar with Message, Message Bar Position.
Buttons
Buttons -You can create any number of buttons/links for your message bar with Add New Button option.
Modal Window with privacy and cookie info
Model Window Custom Content – Here you can enable or disable Modal Window with privacy and cookie info Instead of displaying the default content set custom content yourself.
Backup Options : Backup & Restore Options
Backup Options these options allow you to backup and restore your custom settings and options. These options also allow you to transfer Theme Options data from site to site.
- Backup Options => helps you to take backup of current Designthemes Framework settings.
- Restore Options => helps you to restore Designthemes Framework settings from last backup.






Leave A Comment?